Left 4 Dead 2 Achievement Unlock Guide – Campaign Unlocks
Left 4 Dead 2 Achievement Guide - Campaign Unlocks
Sick and tired of trying to get some help on a specific achievement online, only to find that every site on the net that spouts about "[Insert Game Name] Achievement Guide here!" only seems to have the name and description (straight from Steam) of the achievements and nothing else? Well we are too, which is why we will describe what needs to be done for some of those tricky or confusing ones.
Section 1: Campaign Unlocks
 Price Chopper
Survive the Dead Center campaign.
 Midnight Riders
Survive the Dark Carnival campaign.
 Ragin' Cajun
Survive the Swamp Fever campaign.
 Weatherman
Survive the Hard Rain campaign
 Bridge Burner
Survive The Parish campaign.
This is pretty simple. Simply start from stage 1 (from lobby if in multiplayer) and survive the final stage for the above campaigns to unlock the specific achievement. If you're finding it particularily difficult, down the difficulty level. Capish?
 Confederacy of Crunches
Finish a campaign using only melee weapons.
 Club Dead
Use every melee weapon to kill Common Infected.
 Head Honcho
Decapitate 200 Infected with a melee weapon.
 Tank Burger
Kill a Tank with melee weapons.
 Chain of Command
Kill 100 Common Infected with the chainsaw.
There, now that that's out of the way, melee achievements! Pretty self explanitory here, start and finish a campaign only using melee weapons for the Confederacy of Crunches achievement, be extra wary of fire key spamming because if you get incapped you will accidently shoot while on the ground. For Club Dead get a Common kill with each type of melee weapon (8 total).
Head Honcho, remove 200 heads with an edged weapon, easy and fun. Chain of Command will come pretty fast, granted you can get your hands on a chainsaw 3 or 4 times. For Tank Burger, your best bet is to run through a campaign on easy difficulty with 3 like-minded friends. Watch yourself, because if you get incapacitated while spamming the fire key you may accidentally pistol shoot the Tank, which will just cause your friends to harp on you. Asides from that it shouldn't take much for four simultaneous melee brainings to bring him down on easy.
 Armory of One
Deploy an ammo upgrade and have your team use it.
 Burning Sensation
Ignite 50 Common Infected with incendiary ammo.
 Septic Tank
Use a bile bomb on a Tank.
 Dismemberment Plan
Kill 15 Infected with a single grenade launcher blast.
Pick up an ammo upgrade (incindiary or frag), deploy, let your teammates use it and voila - Armory of One. Burning Sensation will come easily, assuming the Director gives you the option of obtaining incindiary ammo. Hit a Tank with a bile bomb? Yes, that easy. Dismemberment Plan may cause trouble for some folks, so just try this; get to a scenario where you stand your ground after alerting the horde then toss a pipebomb into the largest chunk of their swarm, give it a moment for the Infected to bunch up nice and close, then fire the grenade launcher before the pipebomb blows.
 Crass Menagerie
Kill one of each Uncommon Infected.
 Robbed Zombie
Collect 10 vials of Boomer vomit from infected CEDA agents you have killed.
 Dead in the Water
Kill 10 swampy Mudmen while they are in the water.
 ClOwnd
Honk the noses of 10 Clowns.
 Fried Piper
Using a Molotov, burn a Clown leading at least 10 Common Infected.
There are five types of Uncommon Infected, one type per campaign. Simply kill one of each for Crass Menagerie: CEDA (Hazmat) zombie, Clown zombie, Mudman (hard to pick out in a crowd, but the brownest and nakedest looking one), Construction Worker zombie and the SWAT zombie. Some Hazmat zombies will have a noticeable vial of green bile on their belt that will drop once killed, pick up 10 of these for Robbed Zombie. Dead in the Water is quite easy, just kill 10 Mudmen while they are in water (I personally just blasted grenade launcher rounds into all pools of water in the third stage to get this one).
For the Clown zombies, melee (rifle butt) a Clown to honk his nose, you can get 2-3 honks per Clown so you will not have to 'honk' 10 different noses. For Fried Piper, watch for an opportune moment where a horde charges and toss a molotov into it, odds are there's a Clown leading them. If that just isn't working for you, go to the final stage (Stadium) and spam molotovs on the swarms that charge in when the helicopter arrives (what worked for me).
 A Ride Denied
Kill a Jockey within 2 seconds of it jumping on a Survivor.
 Acid Reflex
Kill a Spitter before she is able to spit.
 Level a Charge
Kill a Charger with a melee weapon while they are charging.
You will most likely get the first two without even trying. If you just can't wait though, wait for a Jockey to come running towards you and find solace behind an NPC. Be ready to hit that bugger with an axe (or the weapon of your choice) the moment it pounces him/her. For the Spitter simply catch one in close quarters (in any stage with lots of hallways) and dispatch of her before she gets to goo on you.
Now the fun one, the Charger. If you've played L4D2 for a couple hours you will generally have a good idea on how this Infected works. Simply watch for a Charger to come barreling towards you (or a teammate), sidestep slightly, and brain him with a good whack as he passes you. Likewise, you can be daring and try your timing at hitting him without sidestepping, but (in my best Cleveland impersonation) that's just crazy.
 Shock Jock
Revive 10 dead Survivors with the defibrillator.
 The Quick and the Dead
Revive 10 incapacitated Survivors while under the speed-boosting effects of adrenaline.
Shock Jock is something that will come over time on easy difficulties. If you're playing on harder difficulties chances are you will find yourself doing this more often. If you don't want to wait, play with some like-minded friends and run around grabbing defib units then killing/reviving teammates like some sort of cruel god. This won't work too well with bots, as they're very loose with their medkits.
For the latter keep an adrenaline shot on you at all times. When a teammate goes down (and isn't close to an NPC, or the NPC is currently too busy) quickly jab yourself and run over to revive them. If your team (of NPCs) just got wiped by a tank because you forgot to fire your gun until they all went down, well then there's 3 right there!
 Stache Whacker
Prove you are faster than Moustachio.
 Gong Show
Prove you are stronger than Moustachio.
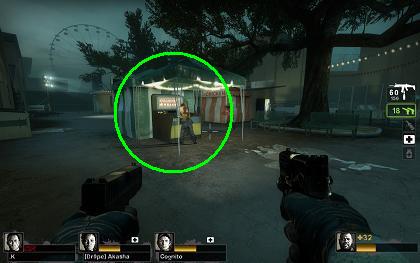
 In the Dark Carnival campaign, stage 4, you will come across this little booth (just before entering the barns). Simply play the game (while your NPCs or friends protect you) by using a melee weapon to whack Mustachio when he pops up. Be sure to hit use to continue your game when it ends so your score doesn't reset! After a certain amount of hits (I believe 42) you will get this achievement. Your prize? A horde of zombies!
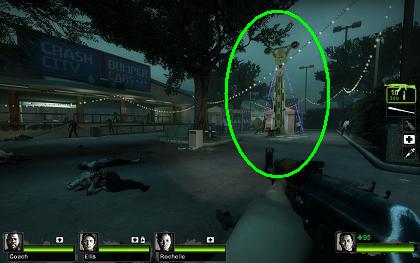
 Again in the Dark Carnival campaign, stage 4, you will come across the strength test just shortly out of the safe room (just before the bumper cars). You may or may not have noticed that your strength on this is dependent on your health. "But I had 100 health and I still didn't get it!", you might be saying. Ah yes, that's because you need to jab yourself with an adrenaline shot before whacking it with a melee weapon. This will cause you to blow the freakin' bell right off the thing. "Baby Peanut", "Oooooooold Peanut", how about I just break your stupid toy?! As punishment for this however, a horde of zombies come to congratulate you.
 Guardin' Gnome
Rescue Gnome Chompski from the Carnival.
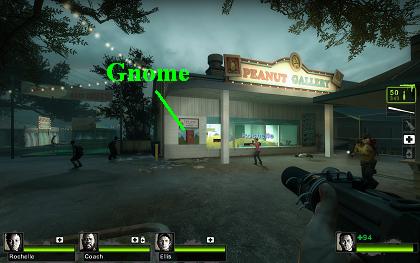
 Firstly, because of my love for puns, Guardin' Gnome... Garden Gnome, get it? Ah that's a good one! Anyways, in the Dark Carnival campaign, stage 2, you will go by a large booth called the "Peanut Gallery". To the left of the window is the prize box containing the gnome and to the right the points board. Start the game by hitting use on the button and shoot the targets, you will need a minimum of 750 points to open the gnome box. To sum it up quickly, shoot Mustachio for 100 points, and avoid shooting Peanut because it'll dock you 100 points. 750 is relatively easy to get, just make sure you have a weapon with a reasonable clip and reasonable reload time.
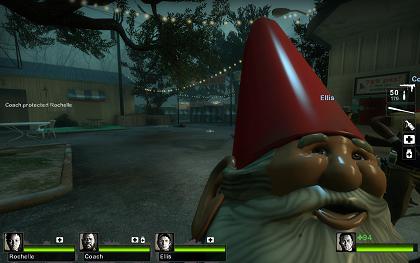
 To get the achievement you must carry the Gnome all the way through to the end of the campaign. As you can imagine this is not too easy, unless of course you just play on easy difficulty. Even then you will find yourself losing track of where your gnome went when you tossed him so you could shoot the horde, or what is probably the most annoying; having him fly off the roller coaster when a Jockey hops on you then having to spend the next 10 minutes hunting the grounds for him while beating back the horde (yes, personal experience, game physics are a bitch). However, if you are holding him lovingly in your arms on the chopper when the end cinematic kicks in, you will be one achievement closer to victory. As a side note, you do not have to start on stage 1 to get this achievement.
 Wing and a Prayer
Defend yourself at the crashed airliner without taking damage.
 Sob Story
Navigate the sugar mill and reach the safe room without killing any Witches.
 Violence in Silence
Navigate the impound lot and reach the cemetary safe room without tripping any alarms.
 Bridge Over Trebled Slaughter
Cross the bridge finale in less than three minutes.
Swamp Fever campaign, stage 2, you will come to a downed airplane where you must open the emergency exit door to proceed signalling the horde. Survive the event without taking any damage, which of course is going to be hard. If you really really want it, play on easy and either bunker down while having everything around you set in fire, or play with friends and get them to protect you. No matter how you try to cheap it though, this is one you will have to earn.
Hard Rain campaign, stage 2, you must traverse the sugar mill that is briming with Witches that you are not allowed to kill. This isn't too hard to do unless you have a team of NPCs that care little about their proximity to Witches, or someone gets reckless with a stray bullet in the overgrown field just before the gas station that is littered with them (where of course they're impossible to see). At that point walk along the pipe through the middle and make a dash to the clearing ahead. If you encounter a Tank, try to pull him towards the building and watch your shots. Do not lob a molotov into the field to hit him, as odds are there'll be a Witch in the blast radius!Here's a tip from Rythmear of the Steam forums. If you do accidentally startle a witch, just let her do her thing and kill the survivor who pissed her off. She'll eventually run off alive and you'll still get the credit. It's a good idea to make sure at least 1 survivor is carrying a defibrillator, hey in Left 4 Dead, accidents do happen!
The Parish campaign, stage 3, you must navigate through a gauntlet of cars under a bridge to reach the cemetery across the lot... without triggering a car alarm. There are options here, I recommend some skilled friends that are good with melee weapons to hack and slash your way through, however if you don't have said skilled friends good luck with bots; you'll need it. Staying calm and together will make this doable, but on the downside Special Infected (like the Jockey) can cause you to stumble against an alarmed car.
The Parish campaign, stage 5, beat it in less than three minutes. Urm. Sadly I have not discovered a tactic to assist with this yet (asides from the fact that you absolutely have to keep moving) and haven't had a chance to tackle this with skilled friends. Once we get a tactic down we'll be sure to add it to here, or if you have anything that has worked for you please feel free to share with our forums and be added to our guide!
 The Real Deal
Survive a campaign on Expert skill with Realism mode enabled.
 Still Something to Prove
Survive all campaigns on Expert.
The Real Deal is not going to be easy to get, but it will be fun. You will need a good team of skilled zombie killers to get through this, I of course recommend the Dead Center campaign and some serious headshot practice. Still, this is one achievement you will have to earn.
Still Something to Prove... all on expert... Why Valve? Why?.. At the time of writing this no one has completed all campaigns on expert and that's pretty understanding. As time progresses there will be strategies and tips to help your team get through this, so as they become known (and of course through our own team's endeavors) we will post them as we see them. If anything in particular has helped you pass a campaign on expert, shoot a line in our forums and let us know!
Interested in seeing how your achievement collection fares against other steam users? Check out the below link to see how many users have each one unlocked! http://steamcommunity.com/stats/L4D2/achievements/
